



Walk into the right garage or showroom and it stops you in your tracks. The floor looks like liquid metal froze mid-flow — shift the angle, the pattern shifts with it. Most people’s first thought is that it can’t be a coating. It looks too deliberate, too custom, too much like something that took years to plan.
It is a coating. And it can go on the concrete floor you already have.
This guide covers the questions that actually matter before you commit to metallic epoxy floor coating — what it is, how it’s made, where it works, what it costs, and what tends to go sideways if you’re not prepared.
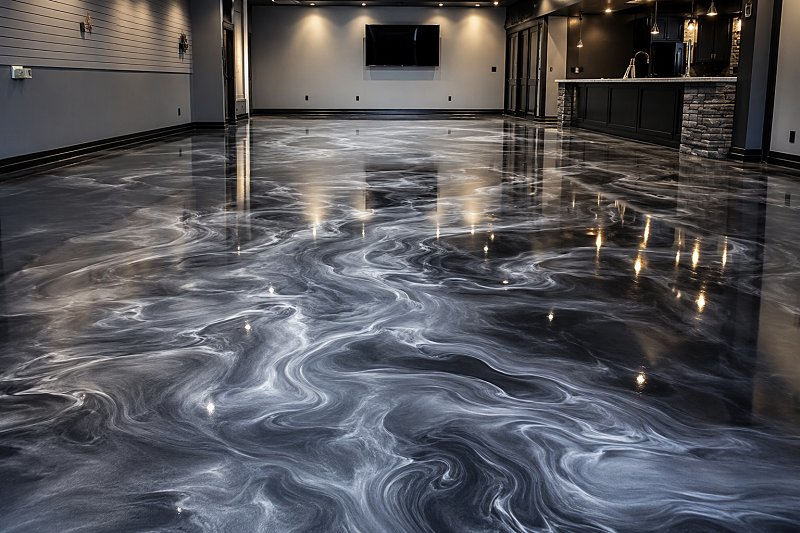
What Is Metallic Epoxy Floor Coating, Actually?
Metallic epoxy floor coating is a decorative system that suspends metallic pigments or pearlescent additives inside a clear epoxy resin. Unlike standard solid-color epoxy or flake systems — where the result is mostly determined by the product itself — the final look of a metallic floor is actively shaped by the installer while the material is still wet. Compressed air, spray bottles, propane torches, squeegees, and specialized tools are all used to push pigment around, creating movement, depth, and pattern.
That’s why no two metallic epoxy floor coating installs look exactly alike. Same pigments, different installer, different day — the floor comes out differently. That unpredictability is what makes it striking. It’s also what makes the skill level of whoever applies it matter more than any other variable in the project.
How Is It Actually Installed?
A complete metallic epoxy system runs through four distinct phases:
Phase 1: Surface Preparation The concrete has to be mechanically ground — typically with a diamond grinder — to achieve a CSP 2–3 surface profile. That roughness is what gives the epoxy something to grip. Any existing coatings, sealers, or contamination get removed first. Moisture levels in the slab need to be tested; a slab that’s pulling moisture up from below will cause the coating to delaminate later, regardless of how well everything else is done.
Skip corners on this step and you’re wasting everything that comes after it. That’s true of most floor coating systems, but it’s especially true for metallic epoxy — surface flaws show more clearly under a reflective finish than under a flake broadcast.
Phase 2: Primer Coat A dark-colored epoxy primer — usually black or deep charcoal — goes down first. It seals the concrete and creates the backdrop that the metallic layer reads against. Dark primers make the pigment colors richer and give the finished floor more perceived depth.
Phase 3: The Metallic Layer (Where the Work Happens) Metallic pigment powder gets blended into clear epoxy resin, poured across the primed surface, spread with a squeegee, and then manipulated while it’s still moving. Air guns, spray bottles of denatured alcohol, and propane torches are the main tools — each one creates different movement in the pigment. Installers wear spike shoes to walk on the wet surface without disturbing what they’ve already done.
This is where the experience gap between installers is most visible. Two people using the same products and the same tools will produce completely different floors based on timing, pressure, and technique.
Phase 4: Topcoat Once the metallic layer cures, one or two coats of clear protective topcoat seal the pigment in and add the abrasion and chemical resistance the floor needs for daily use. The topcoat choice matters more than most people realize — more on that below.
Full installation typically takes 2 to 3 days. Light foot traffic is generally possible within 1 to 3 days after the topcoat application. Full chemical cure takes 7 to 14 days — avoid parking vehicles or placing heavy stationary objects on the floor during that window.
What Patterns and Effects Can You Get?
Marble Effect — white, gray, and gold pigments flow together to create veining that reads like natural marble. Clean, high-end, works in almost any upscale setting.
Lava Flow — high-contrast pigments spread over a dark base, creating the impression of molten material moving across the surface. Dramatic, best in spaces designed to make an impression.
Galaxy / Cosmic — deep dark base with silver or multi-color accent pigments scattered through it. Reminiscent of deep space. Popular in display-focused garages.
Ocean / Water — layered blues that create a sense of depth and movement. Most effective in spaces with good natural light; looks flat in dark garages.
Geode — mimics the crystalline interior of a geode, with concentrated patterning and high color contrast. Works best as an accent area rather than a full floor treatment.
In 2026, the color directions getting the most traction are silver-gray, champagne gold, and midnight blue — neutral tones that complement modern and industrial interiors without looking like a trend that’ll feel dated in three years.
Where Does It Work — and Where Doesn’t It?
Residential Garages The most common application by volume. For homeowners who want something beyond the standard gray flake system, metallic epoxy floor coating turns a basic garage into something that photographs like a showroom. It handles daily vehicle traffic without issue and hides minor surface wear well under its reflective finish.
Basements A metallic floor changes the character of an unfinished basement faster than almost anything else — no carpet, no tile, no ceiling work required. It’s moisture-resistant when properly installed and easy to clean. The key qualifier is that sub-slab moisture has to be tested and addressed during prep; below-grade slabs are more prone to moisture vapor transmission than garage slabs.
Commercial Spaces Retail showrooms, car dealerships, fitness studios, restaurant entryways — spaces that need to create an impression at first glance. A boutique hotel lobby in Shanghai used copper and silver metallic epoxy floor coating with a polyaspartic topcoat and achieved a seamless high-gloss surface that held up under heavy daily foot traffic.
Where It Doesn’t Fit Industrial facilities with sustained heavy chemical exposure, and outdoor surfaces that receive direct sun. Standard epoxy topcoats yellow under UV exposure — a metallic floor that starts yellowing loses most of its visual appeal quickly. If the application involves outdoor or sun-exposed areas, a polyaspartic topcoat becomes mandatory, not optional.
What Does It Cost?
Metallic epoxy floor coating runs higher than standard solid-color or flake epoxy systems. The material cost is higher, and the application takes more skill and more time. 2026 pricing by project type:
| Project Type | Per Square Foot | Typical 2-Car Garage Total |
|---|---|---|
| Base metallic epoxy system | $5 – $8 | $2,000 – $4,000 |
| Premium formulas / complex designs | $8 – $12 | $4,000 – $6,000+ |
| Commercial spaces (large area) | $6 – $10 | Varies by footage |
What moves the number higher: slab condition (crack repair and old coating removal add cost), design complexity, installer experience level, and local labor rates.
Before signing anything, confirm that concrete grinding, crack repair, and the topcoat are all included in the quote. Some contractors price low upfront and then invoice separately for prep work — which is the most expensive part of the job.
The Topcoat Decision Matters More Than People Think
You can have perfect pigment work on the metallic layer and still end up with a floor that disappoints in two years if the topcoat is the wrong choice.
Epoxy Topcoat Lowest cost option. Poor UV stability — in any space that receives meaningful sunlight, yellowing within 2 to 3 years is likely. The yellowing shifts the apparent color of the metallic pigments underneath, making the floor look aged before its time. Acceptable for fully interior spaces with no sun exposure.
Aliphatic Polyurethane Topcoat Significantly better UV stability and scratch resistance than epoxy topcoat. This is the most common choice for residential metallic epoxy floor coating installs in 2026. Keeps pigment colors truer for longer and handles the day-to-day abrasion of a working garage well.
Polyaspartic Topcoat Best UV stability and durability of the three, plus the fastest cure time. The preferred topcoat for commercial high-traffic applications and for any residential install where the floor gets direct sun exposure. Higher upfront cost, but the color retention and longevity justify it in the right situations.
Maintenance: What It Actually Takes
Day-to-day upkeep isn’t demanding. Sweep or dust mop regularly to keep abrasive particles off the surface, wet mop weekly with a pH-neutral cleaner, clean up spills quickly — especially acidic ones like citrus or wine — and use felt pads under furniture to prevent scratching when things get moved around.
Every 5 to 7 years, depending on traffic and wear, a fresh topcoat can restore the original gloss and protective layer.
One hard rule: stay away from bleach, ammonia, and acid-based cleaners. They degrade the topcoat over time, and once the surface loses its sheen, it picks up staining more easily. A dull metallic floor is a much less impressive metallic floor.
DIY or Professional Install?
Straight answer: metallic epoxy is the least forgiving floor coating system to DIY.
Standard flake epoxy? A careful homeowner with proper prep and good instructions can pull off a solid result. Metallic is different. The design work in Phase 3 requires feel — knowing when to hit the surface with air, how much pressure, when to walk away and let it settle. That knowledge comes from doing it, not from watching it. The most common DIY outcomes are uneven pigment distribution, unnatural-looking patterns, trapped air bubbles, or delamination from inadequate surface prep.
DIY kits exist and they’re fine for homeowners who want to experiment and aren’t attached to a specific outcome. But if the point is a floor worth showing off, the installer matters as much as the product. Find someone with a portfolio of actual metallic installs — not just flake work — before committing.
Quick Answers to Common Questions
How long will it last? In a residential garage with an aliphatic polyurethane or polyaspartic topcoat, a well-installed metallic epoxy floor coating system typically holds its appearance for 10 to 15 years. High-traffic commercial spaces may need a topcoat refresh at the 5 to 7 year mark.
How soon can I use the floor after installation? Light foot traffic is generally safe within 1 to 3 days after the final topcoat. Full chemical cure takes 7 to 14 days — no vehicles, no heavy equipment sitting in one spot during that period.
Can it go over an existing coating? The existing coating has to come off first — there’s no shortcut here. Old paint, sealers, and failed epoxy all need to be ground off before the new system goes down. That removal work adds time and cost, so confirm it’s accounted for in any quote you receive.
One Last Thing
Of all the floor coating systems available, metallic epoxy floor coating has the highest ceiling for visual impact — and the smallest margin for error. Get the installer right, get the surface prep right, and pick a color direction that actually fits the space. Those three decisions determine whether you end up with a floor that still looks worth the money a decade later.