
You just had your garage floor coated. The crew packed up, everything looks great, and now you’re staring at the door wondering when you can actually use the space again.
This is where most people either get impatient and damage the floor, or wait far longer than they need to because nobody gave them a clear answer. Epoxy cure time gets complicated fast — manufacturers list numbers that assume ideal conditions, contractors give estimates that vary by system, and the difference between “dry” and “cured” is something most people don’t realize matters until something goes wrong.
Here’s a clear breakdown of what each cure stage actually means, what the real numbers look like for different systems, and which factors can push those timelines in either direction.
Dry vs. Cured: Why These Are Two Different Things
The most important thing to understand before anything else: a floor that looks dry is not necessarily a floor that’s cured.
Drying is a surface event — the top layer firms up, stops being tacky, and feels solid underfoot. Curing is a chemical event — the epoxy resin and hardener are completing their crosslinking reaction throughout the full depth of the coating. That reaction continues long after the surface feels hard.
Drying and curing are different processes — the floor can be dry to walk on but not yet cured for cars.
Walk on a floor before it’s ready and you risk scuff marks, surface impressions, and bond disruption. Park a car on it before full cure and you’re risking tire pickup, surface distortion, and permanent marks. The stakes are different at each stage — which is why understanding the stages matters.
The Four Stages of Epoxy Floor Coating Cure
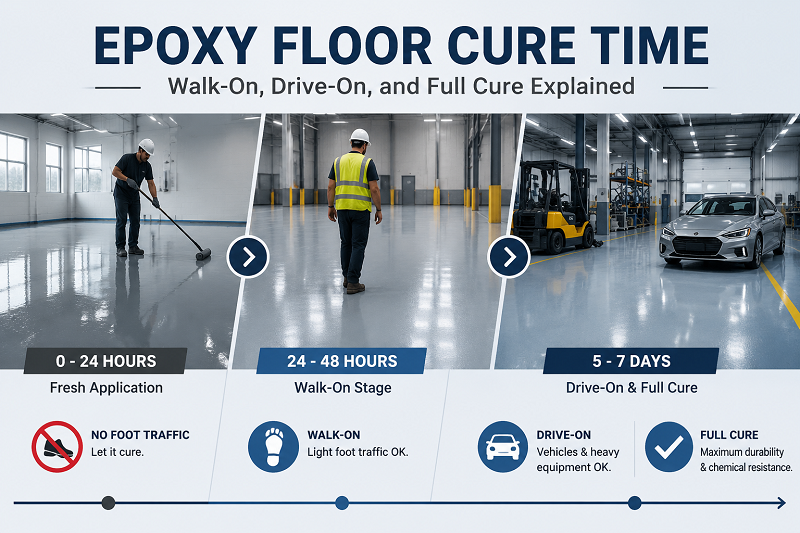
Stage 1: Surface Dry (Tack-Free) The top layer is no longer sticky. You can walk across it to check, but that’s about it. No foot traffic, no objects placed on the surface. This typically happens 8–14 hours after application under normal conditions.
Stage 2: Walk-On Ready Light foot traffic is safe — socks or soft-soled shoes, no dragging, no heavy items. This is the stage where you can start moving back lightweight items. If using 100% solids epoxy, your floor will be cured and walkable in about 12–18 hours.
Stage 3: Return to Service (Drive-On Ready) This is when furniture, shelving, and vehicle traffic become safe. You can return to full heavy traffic after about 36–72 hours. The coating has enough hardness to handle the weight and movement without permanent marking — but the chemical cure is still ongoing underneath.
Stage 4: Full Chemical Cure Maximum hardness, full chemical resistance, complete crosslinking. Between days 5 and 7, most garage epoxy floors reach full cure under normal conditions. The coating has developed maximum hardness and resistance to hot tire transfer, chemicals, and vehicle weight.
Cure Time by System Type
Not all floor coatings follow the same timeline. The system you have — or are choosing — significantly affects how long each stage takes.
Standard 100% Solids Epoxy
The most widely installed garage floor coating. Cure timeline under ideal conditions (70–75°F, 50% humidity):
| Stage | Timeframe |
|---|---|
| Surface dry (tack-free) | 8–14 hours |
| Walk-on (light foot traffic) | 12–24 hours |
| Return to service (light vehicles) | 48–72 hours |
| Full chemical cure | 5–7 days |
Water-Based Epoxy
Water-based systems are thinner, lower in solids content, and generally cure faster to the touch — but they also build less thickness per coat and reach lower final hardness than 100% solids systems.
| Stage | Timeframe |
|---|---|
| Surface dry | 4–8 hours |
| Walk-on | 8–16 hours |
| Return to service | 24–48 hours |
| Full cure | 3–5 days |
Polyaspartic Floor Coating
Unlike traditional epoxy that can keep you waiting for days, polyaspartic coatings offer lightning-fast cure times that get you back to using your space in hours, not days.
| Stage | Timeframe |
|---|---|
| Surface dry | 1–2 hours |
| Walk-on | 4–6 hours |
| Return to service | 12–24 hours |
| Full cure | 24 hours |
Most polyaspartics are walkable after 6 hours and can be returned to normal service after 24 hours. This is the primary reason polyaspartic is the dominant choice for commercial projects and any situation where floor downtime is genuinely costly.
Polyurethane Floor Coating
Cure speed sits between epoxy and polyaspartic — a well-rounded middle ground for topcoat applications. Aliphatic polyurethane typically reaches surface dry at 4–8 hours, return to service at 24–48 hours, and full cure at 3–5 days.
| Stage | Timeframe |
|---|---|
| Surface dry | 4–8 hours |
| Walk-on | 8–16 hours |
| Return to service | 24–48 hours |
| Full cure | 3–5 days |
Polyurethane is most commonly applied as a topcoat over an epoxy base — in that case, the full system’s cure timeline follows the epoxy base coat schedule. As a standalone system, it cures slightly faster than 100% solids epoxy but slower than polyaspartic. Specific timelines vary by product — always check the technical data sheet.
What Moves the Timeline
The numbers above assume ideal conditions. In the real world, several variables push these timelines longer — or occasionally shorter.
Temperature: The Biggest Variable
The general rule: the cooler the floor, the longer the dry times. The warmer the floor, the shorter. Do not apply any epoxy below the recommended temperature range (typically 55°F floor temperature). Too cold a floor can stop the curing process entirely, and warming the room afterward may not restart it — meaning the floor stays tacky permanently and must be ground off.
As a working rule: every 10°F drop in temperature roughly doubles the cure time. A floor that cures in 24 hours at 75°F might take 48+ hours at 55°F — and potentially fail to cure properly below that.
| Floor Temperature | Effect on Cure Time |
|---|---|
| Below 50°F (10°C) | Risk of cure failure — avoid application |
| 50–60°F (10–15°C) | Significantly extended — add 50–100% to standard times |
| 65–75°F (18–24°C) | Ideal range — published times apply |
| Above 85°F (29°C) | Faster surface dry, but risk of trapped bubbles and exothermic heat |
Practical tip: The floor temperature matters more than the air temperature. A garage slab in early spring can be significantly colder than the air feels. Use an infrared thermometer on the concrete itself before starting.
Humidity
High humidity (over 90%) can interfere with the curing process, resulting in a tacky finish. Moderate humidity (40–70%) is fine. Problems arise at extremes — very high humidity introduces moisture contamination into the curing layer, while very dry conditions can affect certain water-based formulations.
Coating Thickness
Applying too thickly traps heat and extends cure time. Thick applications also increase the risk of surface wrinkling and solvent entrapment. Stick to the manufacturer’s specified coverage rates. Multiple thinner coats cure more reliably than one heavy application.
Ventilation
Closing the garage too tightly can slow curing, especially in cooler weather. Airflow helps the curing process along. Running a fan to move air across the surface without creating dust is a simple way to support consistent cure, particularly in the first 12–24 hours.
Concrete Moisture Content
A slab with elevated moisture vapor levels doesn’t just affect adhesion — it can slow curing by introducing moisture into the system from below. If the floor has moisture issues, a vapor barrier primer addresses this before any topcoat goes down.
Common Mistakes That Damage Floors During the Cure Window
Parking too soon Parking a car before full cure risks tire marks or surface distortion. Cooler temperatures can extend cure time beyond seven days, so always factor in ambient conditions when planning vehicle return.
Using the wrong footwear Walking on a partially cured floor in shoes with hard soles, narrow heels, or grip treads can leave permanent impressions. Soft-soled shoes or socks only during the walk-on phase.
Dragging objects across the surface Even after return-to-service, dragging furniture, tool chests, or shelving across the floor before full cure can scuff or score the surface. Lift, don’t drag, until day 7.
Washing the floor before full cure Never add water, cleaning agents, or heavy objects before the recommended cure time — even if the area looks dry. Water introduced before full chemical cure can cloud the finish and weaken the topcoat’s final hardness. Wait for full cure before the first wet clean.
Applying heat to speed up the process Space heaters aimed at a freshly coated floor create uneven temperature gradients that cause bubbling, crazing, and uneven gloss. If the space needs to be warmer, heat the room before application — not after.
A Practical Timeline for a Standard Garage Floor Project
This covers a standard 100% solids epoxy system installed in a two-car garage under normal conditions (68–75°F, 50% humidity):
| Timeline | What’s Safe |
|---|---|
| Day 1 (installation day) | Stay completely off the floor |
| Day 2 (12–24 hours) | Light foot traffic in soft-soled shoes only |
| Day 3 (48–72 hours) | Lightweight items can be returned; still no vehicles |
| Day 4–5 | Standard foot traffic; avoid dragging or heavy items |
| Day 7 | Full cure — vehicle parking, furniture, first wet clean all safe |
If you’re working with a polyaspartic system, compress this entire timeline to roughly 24 hours. Walk-on happens same day, vehicle parking within 24 hours, full cure within 24–48 hours.
What Happens If You Use the Floor Too Early?
It depends on how early and what the contact is.
Light foot traffic at 10 hours on a floor that’s ready at 12 hours: probably no visible damage, minor risk. Parking a car at 24 hours on a floor that needs 72 before vehicle traffic: tire pickup, pressure marks, and potentially permanent surface distortion.
Rushing this stage can result in tire marks, delamination, or a reduced lifespan of the coating.
If damage does occur during the cure window, address it quickly. Minor scuff marks on a partially cured floor can sometimes be lightly sanded and recoated before full cure completes — once the system has fully hardened, repairs become more involved.
The Short Version
- Walk-on: 12–24 hours for standard 100% solids epoxy; 4–6 hours for polyaspartic
- Drive-on: 48–72 hours for epoxy; 12–24 hours for polyaspartic
- Full cure: 5–7 days for epoxy; 24 hours for polyaspartic
- Temperature is the most significant variable — below 55°F, cure quality is at risk
- “Dry” and “cured” are not the same thing; the floor can look done before it is done
- When in doubt, wait the extra day — a week of patience is cheaper than a full recoat