



When an epoxy floor goes wrong, it’s rarely the material’s fault — most of the time, the coating never bonded firmly to the concrete underneath.
Concrete surface preparation for epoxy is the dull part of a floor job — and the part that decides whether the coating is still bonded in year ten or lifting by the first winter. No formulation fixes a bad substrate. A well-prepped slab, on the other hand, makes even a mid-range system look good.
This guide covers what prep actually has to achieve, how CSP levels work, when to grind and when to shot blast, and the tests that tell you a slab is ready. It’s written for distributors, installers and facility buyers who need to specify prep — or check somebody else’s.
What Surface Prep Has to Do
Three things. Every method below gets judged against them.
First, remove whatever shouldn’t be there: laitance, curing compounds, sealers, old coatings, oil, dust. Laitance matters most. It’s the weak, chalky skin of cement paste and fines that rises to the surface during finishing, and epoxy bonded to it is only as strong as the laitance itself — which isn’t very.
Second, open the pores. Epoxy bonds partly by soaking into the slab. A hard-troweled floor is dense and glassy, and the resin has nothing to wick into.
Third, create a profile: a texture the cured coating can lock into mechanically. Too shallow and it slides. Too deep and it telegraphs through. That’s where CSP levels come in.
CSP Levels, Explained
The International Concrete Repair Institute (ICRI) publishes Guideline 310.2R, which grades concrete surface profile from CSP 1 (nearly smooth) to CSP 9 (very rough). Contractors compare the prepared floor against a set of rubber replica chips. Hold one against the slab under raking light, see which looks closest. Nothing fancy.
| CSP | Typical method | Typical use |
|---|---|---|
| 1–2 | Detergent scrub, light acid etch, light grinding | Sealers, very thin films |
| 2–3 | Diamond grinding, light shot blasting | Thin-film epoxy and primers |
| 3–4 | Medium shot blasting, heavy grinding | Self-leveling and mid-build systems |
| 4–5 | Heavy shot blasting | Broadcast flake, quartz, mortars |
| 6–9 | Scarifying, scabbling | Heavy repair work; rarely needed for coatings |
Rule of thumb: the thicker the system, the deeper the profile it needs. A 10-mil (250 µm) roll-on coat over a CSP 5 surface leaves peaks poking through and pinholes in the valleys. A heavy broadcast system over CSP 2 never anchors properly. Ranges vary by manufacturer, and the technical data sheet beats any general chart — this one included.
Diamond Grinding
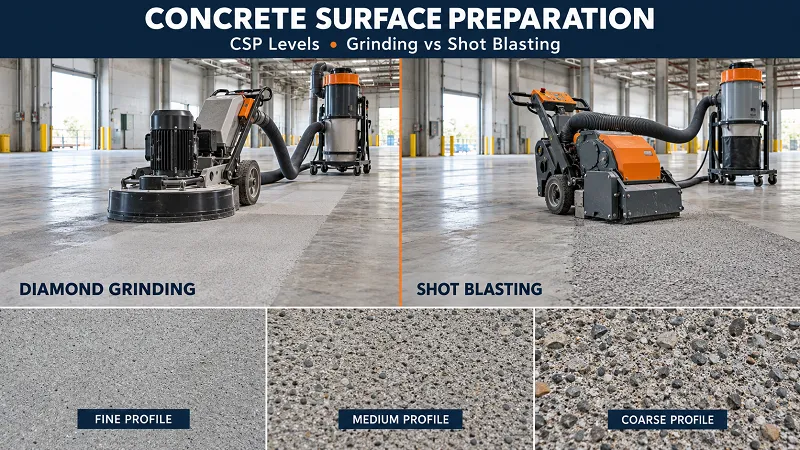
Diamond grinding uses a walk-behind machine with diamond-segment tooling spinning against the slab, hooked to a HEPA vacuum. The result is typically CSP 2 to 3, depending on tooling grit.
It’s precise. A grinder reaches walls, columns and drain edges, takes down high spots, strips thin coatings and removes laitance in a controlled way. Indoors, with a shroud and vacuum, it’s also the cleaner option.
Where it struggles: speed, and thick or soft coatings. Mastic and heavy old epoxy gum up standard tooling, so you’ll need PCD (polycrystalline diamond) tooling or a different method altogether. Grinding can also polish dense concrete instead of opening it. Hard concrete usually wants soft-bond diamonds; soft concrete wants hard-bond. Crews that ignore this end up with a slick floor and a long weekend.
Shot Blasting
Shot blasting throws steel shot at the floor at high speed. The shot and dust get pulled back into the machine, separated, and the shot is reused. Profile typically lands at CSP 3 to 5, and it stays consistent across the whole floor.
The big advantage is speed. Roughly, a shot blaster covers around 1,000 sq ft (90 m²) an hour on open floor, where a walk-behind grinder manages a few hundred — field averages swing a lot with machine size and concrete hardness. It’s dry, low-dust when the collector works, and it strips curing compounds, sealers and thin coatings well.
The downsides are real, though. It can’t reach edges, so a grinder still runs along every wall. The machines are heavy, which rules them out for small rooms, mezzanines and some suspended slabs. And an aggressive blast can leave more profile than a thin coating wants.
| Diamond grinding | Shot blasting | |
|---|---|---|
| Typical profile | CSP 2–3 | CSP 3–5 |
| Best for | Small to mid areas, edges, leveling, thin coatings | Large open floors, sealers, curing compounds |
| Speed | Slower | Several times faster on open floor |
| Edges and corners | Yes | No — needs a grinder |
| Dust control | HEPA vacuum and shroud | Built-in collector |
| Main risk | Polished surface from wrong tooling | Profile too aggressive for thin films |
Most commercial crews end up doing both: blast the field, grind the perimeter, vacuum everything. For a garage-size job, grinding alone is usually enough.
One safety point that shouldn’t be buried. Abrading concrete releases respirable crystalline silica. In the US, OSHA’s silica standard (29 CFR 1926.1153) requires dust controls on construction work, and the UK, Canada and Australia have comparable rules. Vacuum extraction and proper respirators aren’t optional extras.
Why Acid Etching Keeps Causing Trouble
Retail kits love etching. It’s cheap and needs no machine. It’s also unreliable. At best it produces CSP 1 — too shallow for most professional systems — and the outcome depends on how evenly the acid sits and how thoroughly it’s rinsed. Leftover acid and salts undermine adhesion. It puts water into a slab you may need dry. And it does nothing about sealers or oil, because acid can’t get through them.
Some manufacturers still allow etching for thin films on clean, unsealed slabs, as long as the pH reads neutral before coating (ASTM D4262 is the usual test). For commercial or industrial work, mechanical prep is the safer spec.
Test Before You Coat
A slab that looks ready isn’t proof of anything. Four checks catch most problems before they become callbacks.
Start with moisture. Concrete releases vapor for months, sometimes years. The two standard tests are ASTM F2170 (in-situ relative humidity probes) and ASTM F1869 (calcium chloride). Many coating manufacturers cap readings around 75% RH or 3 lb per 1,000 sq ft per 24 hours, but limits differ by product, so check the data sheet. A taped 18 × 18-inch plastic sheet (ASTM D4263) is a quick screen, not a measurement. When readings come in high, a vapor barrier primer is the fix — Jincheng’s two-component, 100% solids, zero-VOC Moisture Vapor Barrier Primer is made for exactly that situation.
Then contamination. Drop a little water on the floor. If it soaks in within about a minute, the pores are open. If it beads, sealer, oil or curing compound is still there. Be especially suspicious of oil: it travels deep, and a surface grind can drag more of it up. Degrease, re-test, repeat.
Check the profile against CSP chips under raking light — in the field and at the edges. Edges are where prep is usually weakest.
Finally, strength. A pull-off test (ASTM D7234) on a small patch is the most honest answer you’ll get. Many specs look for roughly 200–300 psi (1.4–2.1 MPa) with failure in the concrete rather than at the coating. And new slabs need at least 28 days of cure before anything goes on them.
Cracks and joints belong in the prep scope too. Route and fill cracks with a suitable repair product first. Never fill a moving control joint with rigid epoxy — it’ll crack straight through the coating along that line. Use a flexible joint filler instead.
Mistakes That Bring Callbacks
- Coating a slab that hasn’t cured. Twenty-eight days is the common minimum.
- Grinding and leaving the dust. Fine dust sits in the profile and works like a release layer. Vacuum twice, ideally HEPA, before the primer goes down.
- Skipping the edges. The field looks perfect; the perimeter peels first.
- Mismatching profile and film thickness, as covered above.
- Treating clean as prepped. A swept, degreased slab with a glossy trowel finish is clean. It isn’t prepared.
- Leaving it open. A prepped slab picks up dust, moisture and foot traffic fast. Coat the same day if you can, and re-test moisture if the floor has been washed or rained on.
Most of the failures in our guide to common epoxy floor coating problems — delamination, bubbling, pinholes — trace back to this list. And prep shows up in the budget too: grinding versus etching, crack repair and moisture testing are all line items in our epoxy floor coating cost breakdown.
Putting Surface Prep Into the Spec
For distributors and OEM buyers, the practical point is that surface prep belongs on the data sheet, not just in the installer’s head. A good technical data sheet states the minimum and maximum CSP for each product, moisture limits, minimum concrete age and recoat windows. If a supplier can’t give you those numbers, treat that as a flag.
Jincheng Resin supplies epoxy, polyurethane and polyaspartic floor coating systems, with OEM and private-label programs that let you put your own branding and spec sheet on the same formulation. Ask any supplier, us included, for the prep requirements up front — before the first pallet ships, not after the first callback.
FAQ
What CSP level do I need for epoxy? Usually CSP 2–3 for thin-film epoxy, CSP 3–4 for self-leveling and mid-build systems, and CSP 4–5 for broadcast and mortar systems. The product’s data sheet has the final say.
Can I apply epoxy to concrete without grinding? On a new, unsealed slab, light etching sometimes works for a thin film. For commercial or industrial floors, mechanical prep — grinding or shot blasting — is the right call.
Is shot blasting better than grinding? Neither wins by default. Shot blasting suits large open floors; grinding suits edges, small areas and leveling. Most professional jobs use both.
How soon after prep can I coat? Ideally the same day. Whatever the timing, coat before the surface gets dirty or damp again, and re-test moisture if the slab has been washed or exposed to rain.