



A garage floor renovation gets inconvenient fast. Cars need somewhere else to park, stored items pile up in the driveway, and work areas sit unusable until the job is done. Commercial spaces have it worse — every closed day is a day the business doesn’t run as it should. A polyaspartic one day system colour flake flooring package solves both problems at once: a decorative finish that goes down on a much shorter schedule than traditional epoxy.
Product listings often shorten this to “Polyaspartic One Day System Colour Flake,” and the name bundles together three things — a compatible basecoat, decorative flakes, and a protective clear finish. Fast curing gets most of the attention, but it’s only one part of what makes the system work. The concrete has to be right for it, the layers need to be chemically compatible with each other, and whoever installs it has to follow the manufacturer’s application window to the letter.
What a Polyaspartic Colour Flake Flooring System Actually Is
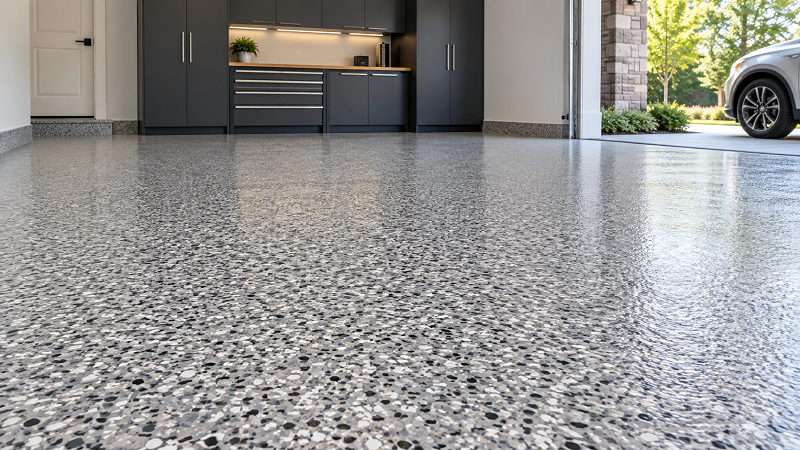
At its core, this is a bonded decorative surface built on top of prepared concrete. Flakes get broadcast into a wet receiving coat, then locked in under a clear topcoat. Instead of leaving bare concrete exposed anywhere, a full broadcast installation covers the entire basecoat in flakes.
Here’s something worth knowing before you shop: the system name doesn’t tell you that every layer is polyaspartic chemistry. Plenty of “one day” packages pair a fast-curing polyurea basecoat with a polyaspartic topcoat. Others run polyaspartic through both layers. Rather than assuming from the headline, check the full system spec sheet. [1, 2]
This distinction shows up when comparing quotes. Two suppliers can both advertise “one day flake flooring” while quietly specifying different primers, different coating thicknesses, or a different return-to-service time. A quote worth trusting spells out each layer and states plainly what’s included in the price.
How the Three Layers Work Together
The basecoat is doing the real bonding work. This is the foundation layer, and it needs to suit whatever condition your concrete is actually in — not the concrete in the brochure photo. It also has to stay workable long enough for flakes to go down evenly across the whole floor. If the spec calls for a separate primer or a moisture mitigation layer, that step becomes part of your project timeline, not an optional extra.
Colour flakes are where the look comes from. Grey, white, and charcoal blends tend to pair well with garage cabinetry and modern interior finishes, while warmer tones often suit retail floors or residential living spaces better. How the finished floor actually looks depends on flake size, the blend ratio, coverage density, and — easy to forget — the clear coat sitting on top of it.
The clear topcoat is what protects everything underneath. A properly chosen polyaspartic clear coat seals the flake layer and becomes the surface people actually walk and drive on. Choosing the right one means thinking honestly about traffic levels, sun exposure, and how the floor will get cleaned. Manufacturers do make UV-resistant polyaspartic formulas, but don’t assume abrasion resistance, stain resistance, or chemical resistance apply across the whole category — check the specific product data sheet. [3]
What “One Day” Actually Means
“One day” typically refers to the installation window under good conditions, not a guarantee about final performance. It doesn’t mean the floor reaches full chemical resistance by evening, and it definitely doesn’t mean you can drive a car onto it right after the last coat goes down.
Ask your supplier to separate out the recoat interval, light foot traffic readiness, vehicle traffic readiness, and full cure — these are four different milestones, not one. A floor can look completely dry and still not be ready for tyre loading, heavy equipment, or aggressive cleaning chemicals.
The slab’s existing condition also affects how long things actually take. Stripping an old coating, patching damaged concrete, or dealing with a moisture problem can all add time onto the schedule. A contractor who’s worth hiring assesses these issues before promising a completion date — a realistic timeline beats an unconditional promise based purely on how fast the resin cures.
Why This System Is Worth Considering
The biggest draw for most buyers is simply less disruption. When the coating stages are properly coordinated, each one can start sooner, which matters a lot when access to the space is the real constraint — not the coating itself.
The decorative payoff matters too. A colour flake floor brings visual texture across a large concrete area without laying individual tiles one at a time, and it can be coordinated with walls, shelving, doors, or display fixtures. One tip worth repeating: approve the blend from a physical sample, not a screen image — flake manufacturers themselves recommend checking real samples for accurate colour. [4]
Don’t overlook maintenance while you’re focused on how the floor looks on day one. A sealed floor still needs a cleaning routine matched to its coating and surface texture. Ask for instructions covering routine washing, spill cleanup, and eventual recoating — a floor that impresses on installation day should also fit into what the owner will realistically keep up with.
Choosing Colour and Surface Texture
Start with the room, not the colour chart. Lighting, floor size, and the colours of permanent fixtures all shape how a blend actually reads once it’s down. View any sample laid flat in the space itself, under daylight and artificial light both — colour swatches lie under the wrong light.
A balanced mid-tone blend is a safe starting point for a working garage. A showroom floor has a different job: it needs to support what’s displayed on it without competing for attention. Request a coated sample board rather than a raw flake sample, since the clear topcoat changes how flakes look once it’s applied.
Texture is its own separate decision, and it’s easy to conflate with colour. Decorative flakes alone don’t guarantee any particular slip rating — the finished surface profile, the topcoat chemistry, and any traction additive specified all factor into it. A wet entrance and a dry display floor have completely different needs. Ask for the relevant slip resistance data, and talk through what a more textured finish means for cleaning.
Installation Starts With the Concrete, Not the Resin
No amount of fast-curing chemistry fixes bad prep. Contamination, unsound material, and incompatible old coatings all need addressing before anything gets applied. Mechanical preparation has to hit the surface profile the chosen system calls for, followed by thorough dust removal — skip this and the rest of the spec doesn’t matter much.
Moisture testing deserves equal attention. Use the manufacturer’s specified test method and acceptance limits, not a rule of thumb from a different job. A polyaspartic topcoat is not a substitute for a proper moisture mitigation system if the slab needs one. Substrate temperature, humidity, and dew point all need checking before work starts, not after. [3, 5]
Once the substrate passes, the crew mixes and applies the basecoat per its technical data sheet, then broadcasts flakes while that coat is still workable. After the specified cure window, loose flakes get swept and the surface is prepped for sealing. The clear coat then goes down at the recommended coverage rate, inside the permitted recoat window.
Plan crew size, batch size, and working sequence before anyone starts mixing. Fast-reacting resin leaves very little room to fix uneven spreading or a missed patch later. Follow the safety data sheet for ventilation and protective equipment — a low-odour product isn’t the same thing as a product with no safety requirements.
Where a Polyaspartic Flake System Fits Best
Garages are the obvious use case, but the same approach suits certain showrooms, retail floors, and light commercial spaces too. What decides the right spec is how the room gets used — not just which colour looks best.
For a workshop, know what chemicals and loads the floor will actually face day to day. For an exposed patio or entrance, confirm the full system is rated for exterior use and that drainage and traction have both been addressed — not just the topcoat’s UV resistance. Industrial facilities often need an entirely different build. A decorative flake finish should never stand in for a real assessment of service conditions.
Comparing Costs and Supplier Proposals
Compare the installed cost of the whole system, not the price tag on a container of resin. Prep work, repairs, coating consumption, flake coverage, and labour all move the final number — a quote built around a perfectly smooth slab can change fast once an old coating needs stripping.
Ask suppliers for a layer schedule that names the product, mixing ratio, coverage rate, and recoat window for every coat. Confirm whether the stated coverage figures already account for your actual substrate and broadcast texture — they often don’t. Before placing a bulk order, request compatible repair products, sample boards, and current technical documentation.
Packaging matters more than buyers expect, especially for contractors and distributors. Check whether kit sizes actually match typical project areas, how partial batches get measured, and what storage conditions the product needs. For private label supply, the technical instructions and label content deserve the same attention as the branding — clear application guidance on the label prevents a lot of avoidable mistakes on site.
Frequently Asked Questions
Can a one day system go over existing epoxy? Sometimes — it depends on whether the existing coating is sound, compatible, and properly prepped. An adhesion assessment and manufacturer approval should decide this, not a guess. Covering a failing coating doesn’t fix its bond to the concrete underneath.
Is colour flake flooring waterproof? A sealed surface helps with everyday spills, but that’s not the same as a certified waterproofing assembly. If waterproofing is genuinely required, the spec needs to address cracks, joints, edges, and penetrations directly.
Can this be a DIY project? Fast-curing materials are unforgiving for anyone without experience. Weigh the equipment, surface prep, and working time honestly before buying a kit — for a true one day install, a professional crew is usually the more realistic choice.
Specify the Whole Floor Before You Order
A polyaspartic one day system colour flake flooring package combines a decorative finish with a genuinely efficient install schedule — but only when it’s specified properly from the start. That starts with an honest read of the substrate, the exposure conditions, and the traffic the floor will see. Choose compatible layers, approve a real sample, and confirm the return-to-service timeline before anything gets scheduled.
For a Jincheng project enquiry, share the floor area, application location, current concrete condition, and preferred colour blend. Ask for a proposed layer specification along with supporting technical data so the materials can be checked against the actual job, not a generic estimate.